How to Draw a Rhinoceros
(the Easy Way)
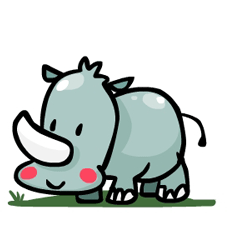
Learning how to draw a rhinoceros has never been easier. No need to head down to the zoo or go on a safari, you're going to make your very own rhino come alive right before your very eyes with just a few simple steps. Sharpen your pencil and follow along below.
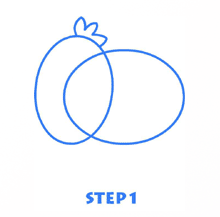
STEP-1: Start with the Head and Body Shapes
Make two ovals approximately the same size. The difference between them is that one will be vertical for the head while the other one will be horizontal for the body. These ovals will be overlapping each other.
Then at the top of the vertical oval of the head, make three curved lines for a little tuft of hair on the cartoon rhino's head.
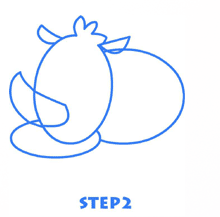
STEP-2: The Ears and the Horn
First erase the extra line of the horizontal body oval that was overlapping the head. Then overlapping both the ovals on the lower part of the head, draw another smaller horizontal oval to create jaw of the rhino. Erase the extra lines from that oval as shown in the example to get a nice clean result.
The next step in learning how to draw a rhinoceros is to make the horn. Make a cline curving up from the centre of the head oval.
This line curves out of the oval, ends in a point and then curves back inside the oval to join up from where it had started.
Now move on to little tuft of hair that you had made on top of the head to make the ears. From the right side of that shape make a small straight line that ends in a point and then curves back to join up at that same point that it started from. Draw the same shape on the other side of the head to make the other ear.
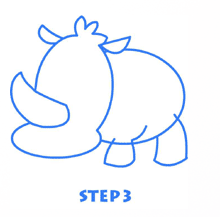
STEP-3: This Rhino's Got Legs!
First erase all the extra lines from the body and the face just like the example image, so that the face and the body become clear.
Now to make the legs, draw a line just at the side of the jaw and from the bottom of the body.
It will be easiest if you draw the shapes in a few steps. First make the curves that go up and down and once you have those, then draw the curves along the bottom of the feet that move side to side. Do the same thing to make both legs.
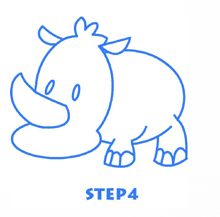
STEP-4: Add the Eyes and the Hoofs
First make a couple of small vertical ovals just above the horn of the rhino for the eyes. There's no real trick to these. Just stick them on the head like in the example of how to draw a rhinoceros.
Once those are done then remove the extra lines from the legs that you made in the previous step and finally draw three tiny curves at the bottom of each of the legs for the hoofs.
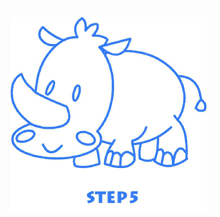
STEP-5: Finish Up with the Mouth and Tail
Make a small little curve just below the horn in the centre of the jaw of the rhino for the mouth. At both sides of the mouth make tiny little ovals for the cheeks.
Then at the back end of the rhino from the centre of the body make another line curving down and ending in a tiny rounded triangle.
Finish your drawing by adding two more legs along the bottom of the body just like you made in the last step.
That's all there is to it for learning how to draw a rhinoceros. Get your coloring tools and have a go at finishing off your drawing with some nice colors.
|
